Arduino FastLED Library – a visual reference for the predefined colors

The FastLED Library for Arduino and other microcontrollers is used for controlling LED-strips with one to hundreds of individually addressable RGB LEDs. Here is a visual reference to the colors that are pre-defined within FastLED. In C++ they can be accessed by name, like this:

CRGB my_color; // Define a variable of type CRGB
my_color = CRGB::AliceBlue; // Variable now contains AliceBlue

The colors in this list appear in the same order as in the FastLED struct that defines them.

The struct itself looks like this:

HTMLColorCode { 
AliceBlue = 0xF0F8FF, Amethyst = 0x9966CC, AntiqueWhite = 0xFAEBD7, Aqua = 0x00FFFF, Aquamarine = 0x7FFFD4, Azure = 0xF0FFFF, Beige = 0xF5F5DC, Bisque = 0xFFE4C4, Black = 0x000000, BlanchedAlmond = 0xFFEBCD, Blue = 0x0000FF, BlueViolet = 0x8A2BE2, Brown = 0xA52A2A, BurlyWood = 0xDEB887, CadetBlue = 0x5F9EA0, Chartreuse = 0x7FFF00, Chocolate = 0xD2691E, Coral = 0xFF7F50, CornflowerBlue = 0x6495ED, Cornsilk = 0xFFF8DC, Crimson = 0xDC143C, Cyan = 0x00FFFF, DarkBlue = 0x00008B, DarkCyan = 0x008B8B, DarkGoldenrod = 0xB8860B, DarkGray = 0xA9A9A9, DarkGrey = 0xA9A9A9, DarkGreen = 0x006400, DarkKhaki = 0xBDB76B, DarkMagenta = 0x8B008B, DarkOliveGreen = 0x556B2F, DarkOrange = 0xFF8C00, DarkOrchid = 0x9932CC, DarkRed = 0x8B0000, DarkSalmon = 0xE9967A, DarkSeaGreen = 0x8FBC8F, DarkSlateBlue = 0x483D8B, DarkSlateGray = 0x2F4F4F, DarkSlateGrey = 0x2F4F4F, DarkTurquoise = 0x00CED1, DarkViolet = 0x9400D3, DeepPink = 0xFF1493, DeepSkyBlue = 0x00BFFF, DimGray = 0x696969, DimGrey = 0x696969, DodgerBlue = 0x1E90FF, FireBrick = 0xB22222, FloralWhite = 0xFFFAF0, ForestGreen = 0x228B22, Fuchsia = 0xFF00FF, Gainsboro = 0xDCDCDC, GhostWhite = 0xF8F8FF, Gold = 0xFFD700, Goldenrod = 0xDAA520, Gray = 0x808080, Grey = 0x808080, Green = 0x008000, GreenYellow = 0xADFF2F, Honeydew = 0xF0FFF0, HotPink = 0xFF69B4, IndianRed = 0xCD5C5C, Indigo = 0x4B0082, Ivory = 0xFFFFF0, Khaki = 0xF0E68C, Lavender = 0xE6E6FA, LavenderBlush = 0xFFF0F5, LawnGreen = 0x7CFC00, LemonChiffon = 0xFFFACD, LightBlue = 0xADD8E6, LightCoral = 0xF08080, LightCyan = 0xE0FFFF, LightGoldenrodYellow = 0xFAFAD2, LightGreen = 0x90EE90, LightGrey = 0xD3D3D3, LightPink = 0xFFB6C1, LightSalmon = 0xFFA07A, LightSeaGreen = 0x20B2AA, LightSkyBlue = 0x87CEFA, LightSlateGray = 0x778899, LightSlateGrey = 0x778899, LightSteelBlue = 0xB0C4DE, LightYellow = 0xFFFFE0, Lime = 0x00FF00, LimeGreen = 0x32CD32, Linen = 0xFAF0E6, Magenta = 0xFF00FF, Maroon = 0x800000, MediumAquamarine = 0x66CDAA, MediumBlue = 0x0000CD, MediumOrchid = 0xBA55D3, MediumPurple = 0x9370DB, MediumSeaGreen = 0x3CB371, MediumSlateBlue = 0x7B68EE, MediumSpringGreen = 0x00FA9A, MediumTurquoise = 0x48D1CC, MediumVioletRed = 0xC71585, MidnightBlue = 0x191970, MintCream = 0xF5FFFA, MistyRose = 0xFFE4E1, Moccasin = 0xFFE4B5, NavajoWhite = 0xFFDEAD, Navy = 0x000080, OldLace = 0xFDF5E6, Olive = 0x808000, OliveDrab = 0x6B8E23, Orange = 0xFFA500, OrangeRed = 0xFF4500, Orchid = 0xDA70D6, PaleGoldenrod = 0xEEE8AA, PaleGreen = 0x98FB98, PaleTurquoise = 0xAFEEEE, PaleVioletRed = 0xDB7093, PapayaWhip = 0xFFEFD5, PeachPuff = 0xFFDAB9, Peru = 0xCD853F, Pink = 0xFFC0CB, Plaid = 0xCC5533, Plum = 0xDDA0DD, PowderBlue = 0xB0E0E6, Purple = 0x800080, Red = 0xFF0000, RosyBrown = 0xBC8F8F, RoyalBlue = 0x4169E1, SaddleBrown = 0x8B4513, Salmon = 0xFA8072, SandyBrown = 0xF4A460, SeaGreen = 0x2E8B57, Seashell = 0xFFF5EE, Sienna = 0xA0522D, Silver = 0xC0C0C0, SkyBlue = 0x87CEEB, SlateBlue = 0x6A5ACD, SlateGray = 0x708090, SlateGrey = 0x708090, Snow = 0xFFFAFA, SpringGreen = 0x00FF7F, SteelBlue = 0x4682B4, Tan = 0xD2B48C, Teal = 0x008080, Thistle = 0xD8BFD8, Tomato = 0xFF6347, Turquoise = 0x40E0D0, Violet = 0xEE82EE, Wheat = 0xF5DEB3, White = 0xFFFFFF, WhiteSmoke = 0xF5F5F5, Yellow = 0xFFFF00, YellowGreen = 0x9ACD32, FairyLight = 0xFFE42D, FairyLightNCC = 0xFF9D2A
}

Avrdude – Burn fuses (16 MHz clock out on CLK0 / B0)

Reason

Fuses. There are a couple of user selectable operation modes of the AVR microcontrollers. The fuses can’t be edited in the same way you normally program you Arduino. You will need a hardware AVR programmer, ie the one described here: Arduino as ISP. There are a few GUI softwares that are supposed to do this, but I couldn’t get any of the Mac OS X ones to connect to my Arduino/Genuino Uno, so I used AvrDude from the Terminal.

I wanted to do this in order to get a 16 MHz clock output on the Arduino Digital pin 8 / B0 / CLK0. This signal was to be used as a Reference Clock for the AV9110 Serially Programmable Frequency Generator.


Parts list

• AVR Programmer
• Arduino Uno
• AvrDude software


Setting (aka Programming) the fuses

Step 1, find out the new fuse settings
Use this site to get the hex numbers for your new fuse settings: http://www.engbedded.com/fusecalc (If you don’t understand the contents of this site you need to read your AVR docs, search the web, or ask yourself if you really need to change any fuses.)

Step 2, burn the fuses with AvrDude

In your shell, type avrdude. (If it says unknown command or similar, you need to CD to the directory where AvrDude is on your Mac.) If it presents a list of AvrDude parameters you’re good to go. This command changes the CKOUT fuse so the system clock is output on B0:

avrdude -c stk500v1 -p m328p -P /dev/cu.wchusbserial410 -b 19200 -U lfuse:w:0xBF:m -U hfuse:w:0xD2:m -U efuse:w:0x04:m 
-c stk500v1 (programmer is Arduino as ISP)
-p m328p (Microcontroller name)
-P /dev/cu.wchusbserial410 (port name)

The above settings can be gathered from the output of the Arduino IDE when uploading a sketch to your Arduino. Please turn on “Verbose Output when uploading”.

lfuse:w:0xBF:m -U hfuse:w:0xD2:m -U efuse:w:0x04:m (New fuse settings)

These are the new fuse settings from http://www.engbedded.com/fusecalc. I was mainly interested in CKOUT = true. Setting the fuses wrongly can make your Arduino unresponsive. Please read up on which fuses NOT to change, prior to experimentation.

Avrdude – Upload hex file to Arduino using ISP / ICSP

Reason

In some cases USB cannot be used to program (upload hex file to) a processor on an Arduino board. One such case is when you are targeting the second processor on an Arduino Uno, the ATMega16u2 whose sole purpose is to cater for USB communication.

Please note: Only the original style Arduino Uno R3 boards have an ATMega16u2 processor, so be sure to use one of those for target.

Another case arises after we succeeded in reprogramming the USB chip. In my case it will become a MIDI communication chip, so USB connectivity is lost and the main processor (ATMega328p) will also have to be programmed with ISP (In-System Programming).

Parts list

• Arduino IDE (I used arduino.cc 1.6.7 but any fairly modern will do)
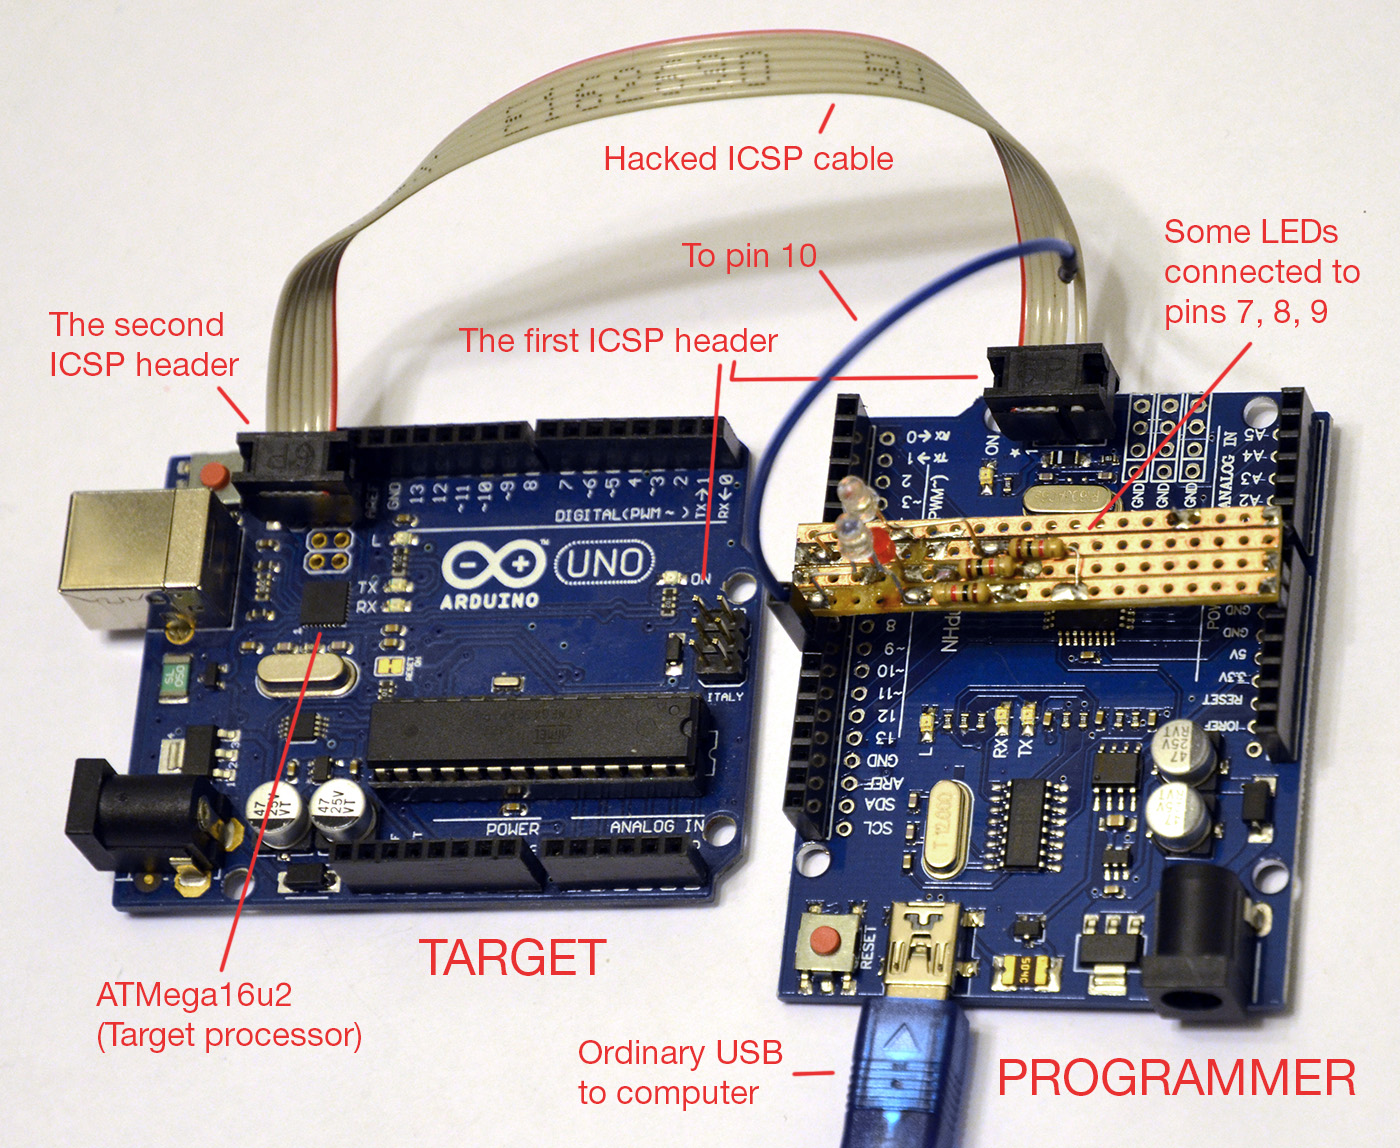
• 2x Arduino Uno R3 (one programmer and one target)
• Hacked ICSP flat cable
• 3x LED / 3x 1k resistors (optional)

More info on the ISP / ICSP cable and connections at Nick Gammon’s

Using an Arduino board as ISP

Step 1, create an ISP programmer
Locate the ArduinoISP example sketch in the Arduino IDE. Upload it to the Arduino board that is to become the programmer. (The programmer board doesn’t necessarily have to be an original Uno, it may use an FTDI232 or CH340 chip for USB communication.)

Step 2, connect the boards
To upload a hex file to the USB-chip (m16u2 aka ATMega 16u2) on an Arduino Uno, you need to connect the programmer’s ISP header to the target board’s second ISP header. (If there is only one 6-pin ISP-header, you don’t have the original UNO.)

Step 3, upload hex file

Shell command

Uploading a pre-compiled hex file to the m16u2 USB controller on an Arduino Uno R3 board, using avrdude and an “Arduino as ISP”-programmer to target the m16u2.

/path/to/avrdude -C /path/to/avrdude.conf -v -p m16u2 -c stk500v1 -P /path/to/serial/port -b 19200 -U flash:w:/path/to/hex/file.hex 

Example

What you see is:
Using Terminal on Mac OS X
Uploading Hiduino midi firmware
from the folder “jobb/EMS/”
Using the “avrdude” that comes bundled with Arduino IDE
Using /dev/cu.wchusbserial410 (the serial port of the “Arduino as ISP”-programmer)

/Applications/Arduino.app/Contents/Java/hardware/tools/avr/bin/avrdude -C /Applications/Arduino.app/Contents/Java/hardware/tools/avr/etc/avrdude.conf -v -p m16u2 -c stk500v1 -P /dev/cu.wchusbserial410 -b 19200 -U flash:w:/Users/gaunitz/Documents/Jobb/EMS/hiduino-master/compiled_firmwares/arduino_midi.hex 

The hard part is to get the file paths right. To get some hints, go to the Arduino IDE preferences and turn on “Show verbose output during -> Upload”. Then upload any sketch to an Arduino, and examine the log output.

After uploading the firmware I connected the target board to the computer with a USB cable and had a look in System Report:

Hiduino_in_system_report

The ATMega16u2 became a generic midi device, communicating with the ATMega328p :)